

When my kids started showing an aptitude for basketball I wanted to take good pictures of them. I wanted to freeze actions and capture amazing shots. So, I bought a fast camera and quite a few fast lenses, dropping a small fortune, and learned how to take their photos through a lot of trial and error. When my kids graduated, many of their friends asked me to take their senior photos. So, I began a small business to do just that. I love taking a precious moment in time and capturing it forever.
I’ve been a photography enthusiast for quite a while now. When my kids started showing
an aptitude for basketball I wanted to take good pictures of them. I wanted to freeze actions and capture amazing shots. So, I bought a fast camera and quite a few fast lenses, dropping a small fortune, and learned how to take their photos through a lot of trial and error. When my kids graduated, many of their friends asked me to take their senior photos. So, I began a small business to do just that. I love taking a precious moment in time and capturing it forever
Most smartphones come with a decent number of megapixels, (the cubes of light that capture your image). This is the most important setting because smaller pixeled photos will not get better as you go bigger. Start bigger!
HOW: Make sure your phone is set to the highest efficiency/resolution format. This is usually done in the settings of your phone. Go to your camera settings (usually a sub-category of your phone’s settings). Make sure the phone is set to the highest resolution. The more pixels the better! Look at these two pictures of me, you can see the difference immediately.
Now Some Easier Stuff:
Start with a clean lens.
Basic, right? Well, how often do you actually do it? You hold the phone in your hand, set it on dirty tables, hold it to your face, etc. Believe me, that phone is filthy. Clean the lens to start with a clear image.
A steady hand and a still subject.
Another, well, duh, right? Think about the way you take a selfie. You hold the phone away from you with one hand and try to use your thumb. Which typically pushes the phone toward said thumb. Or you use the side button, which pushes the phone down. Not to mention you have this long lever (your arm) hovering. All of which move the phone slightly.
Also, be steady or still subject. In other words, don’t move!
There is a mechanism that helps to correct all of these things, a little, but fuzziness and distortion can occur pretty easily.
Also, if you zoom in and your image is grainy, that will only intensify when you blow it up on your social media or website.
Try using the timer option on your phone and set the phone a little higher than eye level, pointing down slightly.
Also, mini tripods are easy and cheap to use.
Open your picture app and touch the screen on the object you want to focus on.
It will hone in and make that the center of focus.
Lighting.
Ring lights are a contraption that holds your cell phone inside a ring of light, and you use a clicker to take the photo. So, it’s extendable studio lighting and a tripod, all in one. AND they aren’t too expensive $30 on Amazon
Never use the flash
You’ll end up looking jaundiced. Instead, try and find an alternative light source.
If you are trying to take a picture of yourself, make sure the light source is on your face! How many times have you gone out to take a picture at sunset. You’re all posed and ready to take your photo, with the sun over your shoulder behind you, then you look at it and you’re in shadow. They don’t call this time the “golden hour” for nothing.
TURN AROUND!
So, you turn around and take the picture but now you’re squinting, because you’re looking directly into the sun. Instead, turn your body so you’re slightly to the side. You’ll get the beautiful glow but no squinting.
You can also use a light building, or area (like grass), to brighten and diffuse light naturally. You can use street or restaurant lights. Hell, even headlights from your car, just put your light source onto your face, rather than behind you.
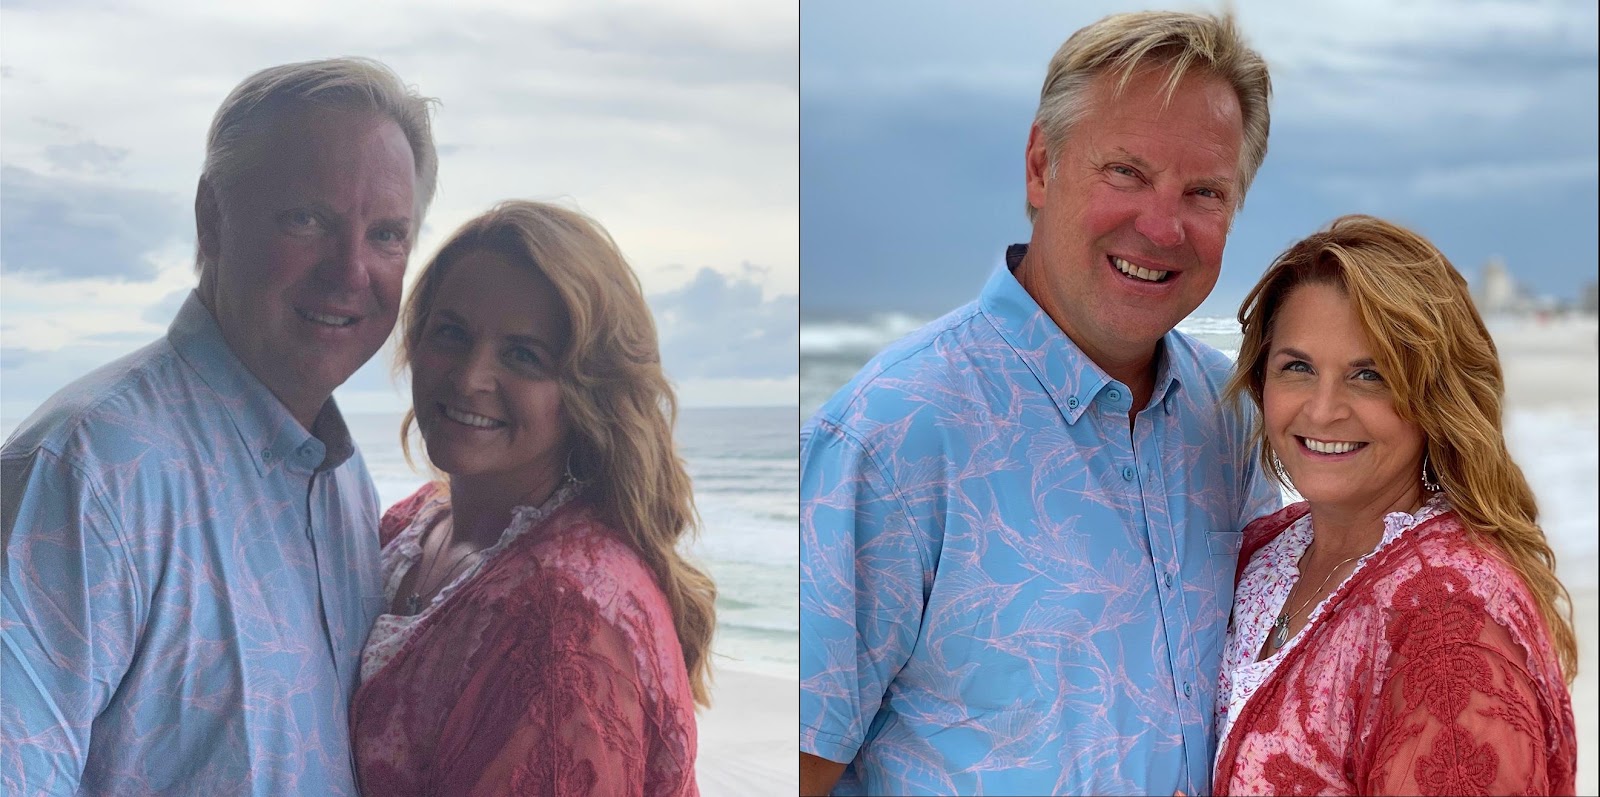
We just got back from Panama City Beach. The photo of Jeff and I below are taken the same day, about 5-10 minutes apart. The first one we are on a back-covered porch facing away from the sun. I didn’t like the lighting even when we turned around, so we went down to the natural light diffuser of the beach. Obviously, the second picture is much clearer, and it’s LATER in the day. If you had to use one of these for social media, which would you want to click on?
Position & Camera Mechanics:
- Tilt your head down. Just a little! It opens up your eyes. This is a slight thing, after all, you don’t want to look possessed. It’s a slight tilt.
- Don’t use filters. Any time you mess with a digital image, it degrades it even more. You want as few touches as possible. Of course, professionals will say there’s ways around that BUT they’re professionals. I’m talking to the average Joe here.
- Zoom as little as possible, rather move your body to the desired location. Again, it’s all about not degrading your photo and zoom, can do that.
I do an author spotlight entitled, Jeny’s TattleTales. I always ask for high res pictures and you would not believe how many authors send me photo’s that are pixelated and grainy. They NEVER translate well, and for most people looking at them, they’re off-putting.
My recommendation? Go spend a few bucks and get a professional headshot done. Whether you’re traditional or self-published, your image should look professional, both on your book jacket AND social media platform. Your author photo is your calling card. The photos you upload to your social media are your calling cards and people DO notice when they aren’t crisp and clear.
Technical item #2:
If you absolutely want to do it yourself or don’t have someone else take the photo, you need to make sure the photo is as quality as possible. That means making it high res.
Whaaat? Wait, that’s too technical what does that mean?
- High res means there are at least 300 dpi (dots per inch). The higher the dpi, the higher the quality of the photo. Who cares? The people looking at your pictures. Well, how the hell do you do that? I’m so glad you asked.
- First find out the size of your picture. For iPhone, go to Photos. Click on the picture you like and click on the i (information) button. I’ve never owned an Android but the concept is probably the same. Wherever you store your photo, find the information.
The more pixels the better. If the picture size is too small, you will not be able to increase the dpi and have it look good. Remember what I said at the beginning about camera setting?
3 ways to change dpi
- In Photoshop: Image > Image size. Uncheck Resample Image. Go to resolution (300 dpi), and set as pixels per inch (from the drop-down menu)
- In GIMP: Image > Print size. Enter preferred resolution (300dpi) next to the x resolution and set as pixels/in
- Through an online converter like https://convert.town/image-dpi or app like Apple: https://apps.apple.com/us/app/dpi-dots-per-inch/id1376445792 or Android: https://android.stackexchange.com/questions/125841/how-to-change-the-density-dpi-for-specific-applications